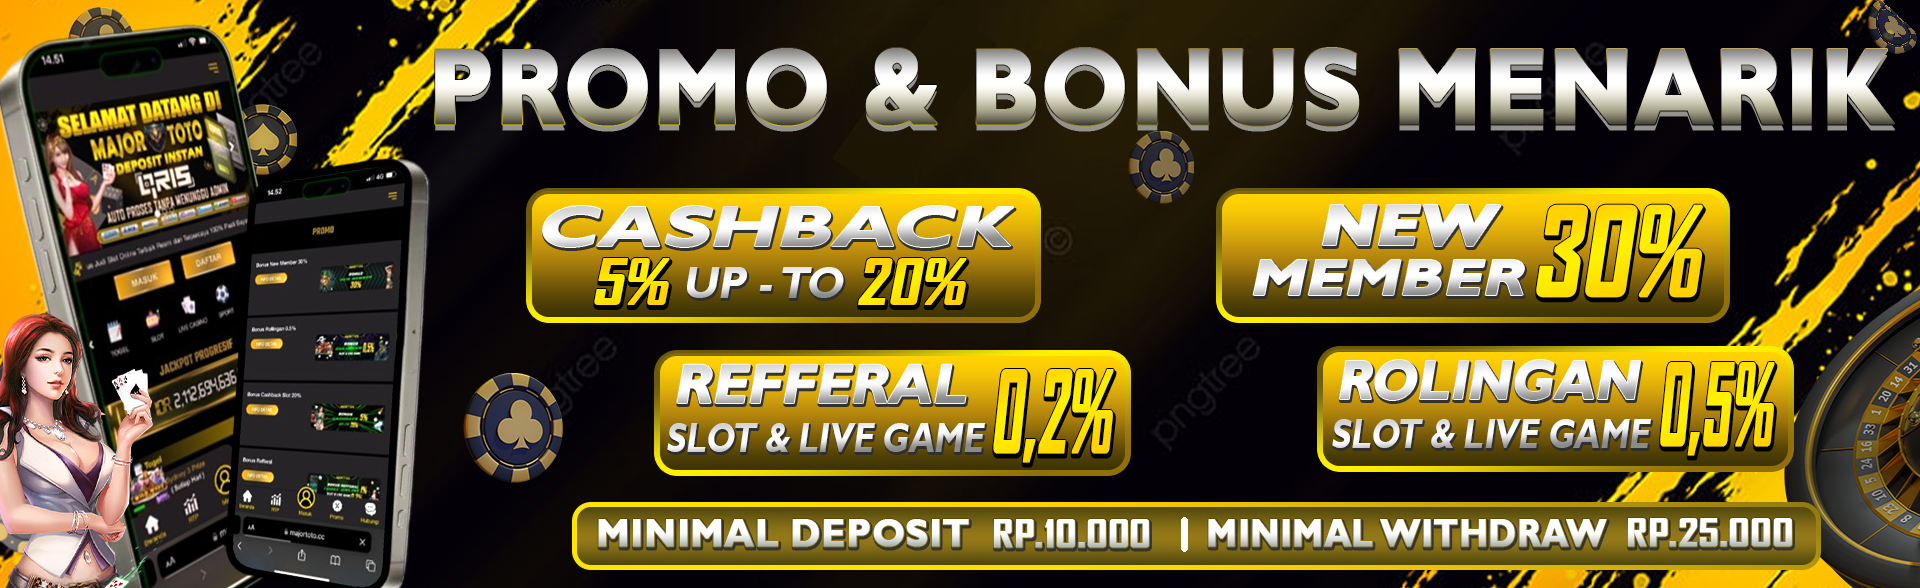
How to install and Enable TLS on Nginx Apache

July 22, 2019
lgvps

To enable TLS or HTTPS service, you must install SSL/TLS certificate on the webserver. The procedure includes installing a certificate, obtaining a private key, and configuring your webserver to use HTTPS. Nginx and Apache web servers can skip the first two steps. After installing the certificate, restart the webserver and point it to the domain you want to use for HTTPS.

TLS 1.3 is the latest version of the Transport Layer Security protocol. It’s based on the existing 1.2 specifications with the proper IETF standard: RFC 8446. It provides stronger security and higher performance improvements than its predecessors.

Requirements

  • Nginx version 1.13.0 or greater.
  • Apache version 2.4.37 or greater.
  • OpenSSL version 1.1.1 or greater.
  • A valid domain name with correctly configured DNS records.
  • A valid TLS certificate.

Install TLS Certificate from Let’s Encrypt

If you’re not sure how to install TLS Certificate from Lets Encrypt, read on. We’ll walk you through the process step-by-step. You may have to change your email address after the initial installation to make it automatic, but it’s worth it for your security. If not, you can try manually renewing your certificate from Lets Encrypt. This is a great way to increase the security of your site without the hassle of reinstalling everything.

To obtain a free SSL Certificate from Let’s Encrypt, you need to install Acme.sh client and a few needed packages on the Linux system.

apt install -y socat git  [On Debian/Ubuntu]
dnf install -y socat git  [On RHEL/CentOS/Fedora]
mkdir /etc/letsencrypt
git clone https://github.com/Neilpang/acme.sh.git
cd acme.sh 
./acme.sh --install --home /etc/letsencrypt --accountemail 
[email protected]
cd ~
/etc/letsencrypt/acme.sh --issue --standalone --home /etc/letsencrypt -d 
example.com --ocsp-must-staple --keylength 2048
/etc/letsencrypt/acme.sh --issue --standalone --home /etc/letsencrypt -d example.com --ocsp-must-staple --keylength ec-256

NOTE: Replace example.com in the above command with your own domain name

Now Just you need to enable TLS 1.3 on your domain, as explained below

Enable TLS 1.3 in Nginx

Enable TLS 1.3 in Nginx

The latest Transport Layer Security protocol (TLS) is available. Based on the 1.2 specifications, TLS 1.3 provides enhanced security and performance improvements. You can enable TLS 1.3 on your Nginx web server for added security. To enable TLS 1.3, ensure you have a valid domain name and DNS records configured properly. You can also use the following method to configure TLS 1.3 on Nginx:

As mentioned above, TLS 1.3 is supported starting from the Nginx 1.13 version. If running the older Nginx version, you must first upgrade to the latest version.

apt install Nginx
yum install Nginx

Check the Nginx version and the OpenSSL version against which Nginx was compiled (make sure that the Nginx version is at least 1.14 and OpenSSL version 1.1.1).

nginx -V

Simple output


nginx version: nginx/1.14.1
built by gcc 8.2.1 20180905 (Red Hat 8.2.1-3) (GCC) 
built with OpenSSL 1.1.1 FIPS  11 Sep 2018
TLS SNI support enabled

Just you need to start by enabling and verifying the Nginx installation

systemctl start nginx.service
systemctl enable nginx.service
systemctl status nginx.service

Then open the Nginx vhost configuration

vi /etc/nginx/conf.d/example.com.conf

Note: you can edit the vhost configuration file with any editor like nano

Now locate the ssl_protocols directive and append TLSv1.3 at the end of the line as shown below

server {
  listen 443 ssl http2;
  listen [::]:443 ssl http2;

  server_name example.com;

  # RSA
  ssl_certificate /etc/letsencrypt/example.com/fullchain.cer;
  ssl_certificate_key /etc/letsencrypt/example.com/example.com.key;
  # ECDSA
  ssl_certificate /etc/letsencrypt/example.com_ecc/fullchain.cer;
  ssl_certificate_key /etc/letsencrypt/example.com_ecc/example.com.key;

  ssl_protocols TLSv1.2 TLSv1.3;
  ssl_ciphers 'ECDHE-ECDSA-AES256-GCM-SHA384:ECDHE-RSA-AES256-GCM-SHA384:ECDHE-ECDSA-CHACHA20-POLY1305:ECDHE-RSA-CHACHA20-POLY1305:ECDHE-ECDSA-AES128-GCM-SHA256:ECDHE-RSA-AES128-GCM-SHA256:ECDHE-ECDSA-AES256-SHA384:ECDHE-RSA-AES256-SHA384:ECDHE-ECDSA-AES128-SHA256:ECDHE-RSA-AES128-SHA256';
  ssl_prefer_server_ciphers on;
}

The last step, verify the configuration and reload Nginx

nginx -t
systemctl reload nginx.service

Enable TLS 1.3 in Apache

To enable TLS v1.3 in Apache, you must configure your server to use the new TLS 1.3 protocol. You can enable this protocol in your server configuration by adding the ssl_protocols directive to your server block listening on port 443. You can also check its status using free online tools like TLS Checker. To install OpenSSL, you must create a non-root user account with sudo access.

Note: If you are running the older version of Apache, you need to first upgrade to the latest version.
Please remember the apache version on the requirements list
Apache version 2.4.37 or greater

to upgrade your apache to the latest version, please apply the following commands

apt install apache2
yum install httpd

Once installed, you can verify the Apache and the OpenSSL version against which Apache was compiled.

httpd -V
openssl version

Now start by enabling and verifying the Apache installation

-------------- On Debian/Ubuntu -------------- 
systemctl start apache2.service
systemctl enable apache2.service
systemctl status apache2.service

-------------- On RHEL/CentOS/Fedora --------------
systemctl start httpd.service
systemctl enable httpd.service
systemctl status httpd.service

Then open the Apache virtual host configuration file using your favorite editor.

vi /etc/httpd/conf.d/vhost.conf
OR
vi /etc/apache2/apache2.conf

and locate the ssl_protocols directive and append TLSv1.3 at the end of the line, as shown below.

<VirtualHost *:443>
SSLEngine On

# RSA
ssl_certificate /etc/letsencrypt/example.com/fullchain.cer;
ssl_certificate_key /etc/letsencrypt/example.com/example.com.key;
# ECDSA
ssl_certificate /etc/letsencrypt/example.com_ecc/fullchain.cer;
ssl_certificate_key /etc/letsencrypt/example.com_ecc/example.com.key;

ssl_protocols TLSv1.2 TLSv1.3
ssl_ciphers 'ECDHE-ECDSA-AES256-GCM-SHA384:ECDHE-RSA-AES256-GCM-SHA384:ECDHE-ECDSA-CHACHA20-POLY1305:ECDHE-RSA-CHACHA20-POLY1305:ECDHE-ECDSA-AES128-GCM-SHA256:ECDHE-RSA-AES128-GCM-SHA256:ECDHE-ECDSA-AES256-SHA384:ECDHE-RSA-AES256-SHA384:ECDHE-ECDSA-AES128-SHA256:ECDHE-RSA-AES128-SHA256';
ssl_prefer_server_ciphers on;
SSLCertificateFile /etc/letsencrypt/live/example.com/cert.pem
SSLCertificateKeyFile /etc/letsencrypt/live/example.com/privkey.pem
SSLCertificateChainFile /etc/letsencrypt/live/example.com/chain.pem

     ServerAdmin [email protected]
     ServerName www.example.com
     ServerAlias example.com
    #DocumentRoot /data/httpd/htdocs/example.com/
    DocumentRoot /data/httpd/htdocs/example_hueman/
  # Log file locations
  LogLevel warn
  ErrorLog  /var/log/httpd/example.com/httpserror.log
  CustomLog "|/usr/sbin/rotatelogs /var/log/httpd/example.com/httpsaccess.log.%Y-%m-%d 86400" combined
</VirtualHost>

Finally, verify the configuration and reload Apache

-------------- On Debian/Ubuntu -------------- 
apache2 -t
systemctl reload apache2.service

-------------- On RHEL/CentOS/Fedora --------------
httpd -t
systemctl reload httpd.service

How to verify that your website is working with TLS

If you’re a website owner, you may be wondering how to verify that your website is working with TSL. TLS is the successor to SSL, and it works in much the same way. SSL/TLS certificates encrypt data transferred to and from a website. This ensures that internet communication is secure. If you’re unsure whether your website is working with TLS, try to disable SSL 1.2 before making any changes to your website.

You can verify that the TLS is working by tapping your website with https like the following example:

LGVPS Hosting | Affordable VPS and Dedicated Servers offers


in the top bar of your browser, you will see that the connection is secured.

TLS HTTPS

TLS HTTPS ensures a secure connection between two sites. The encryption process involves a set of steps known as the handshake. A website owner generates a certificate, known as a CSR, on its server. The certificate contains details of the website, ranging from a full business profile to a simple server identity. The CSR is then submitted to a Certificate Authority for issuance. Afterward, the user can access the site securely.

The right decision!
If you're ready to make an impact in your business, it's time to get started now! Discover our offers and make the right decision!
Get Started Now!
payment gateway method for lgvps company
Stripe paypal method for lgvps
A BeinCart LLC Company
Copyright © 2022 BeinCart LLC | Designed by LGVPS Team